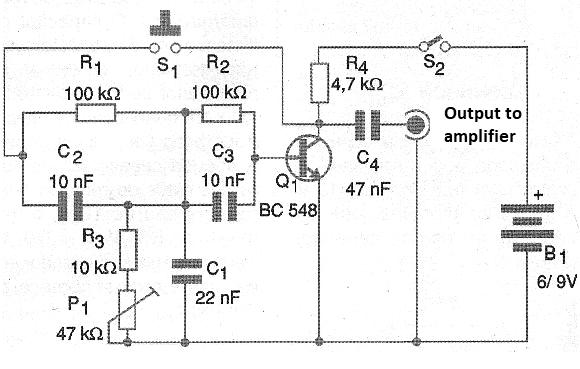
This circuit consists of a damped audio oscillator that generates signals corresponding to musical instruments or percussion instruments such as drums, bells, etc., with great perfection.
The resonance of sound, that is, its extension, which characterizes a beating on a glass or metal object as a bell, is obtained by means of a controlled feedback. By reducing this feedback we get more "dry" sounds like drums or blocks of wood.
This means that by adjusting the trimpot or potentiometer, we can measure the resonance of the beat, taking it from the sound of bells and brass to that of blocks of wood or drums. The values of the capacitors determine the frequency of the sound, which in the case of a bell can be associated with its size.
We also have the determination of other imitated instruments such as small drums, bass drums or deaf, according to the desire of the assembler. The values of the capacitors, however, must maintain a fixed relation of values.
Thus, if we change any capacitor, the rest of the "twin T" must be changed in the same proportion for the circuit to oscillate. We can, for example, use a capacitor of 47 nF instead of 22 nF and 22 nF instead of 10 nF, thus obtaining a "larger" signal. The values of this twin T can be within the range of 2.2 nF to 470 nF, which allows the assembler to get exactly the percussion sound he wants for a particular application.
The circuit power can be made with voltages from 6 to 12V and the transistor is a NPN of general use as the BC548 or any equivalent. For the output connected to an amplifier it is important to use shielded wire with plug according to the AUX input. The volume control is done on the amplifier used.
If several units or oscillators are mounted, a small mixing circuit must be used to mix their signals, applying them to a single output.
ASSEMBLY
In figure 1 we have the complete diagram of the percussion generator.

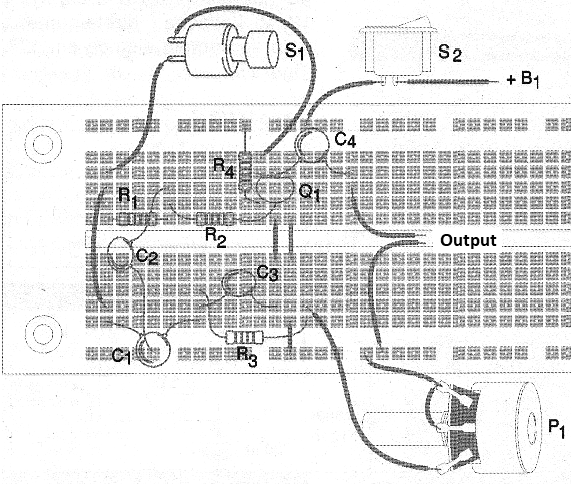
The arrangement of the components in a protoboard is shown in figure 2.

As it comes to assembly rather simple and not critical this is the ideal version for the beginner or experimenter who wants to do tests with this circuit. However, those who desire this circuit as part of a more elaborate design can make use of a printed circuit board for assembly.
The board (or printed circuit board) can be fixed inside a plastic box along with the battery holder or battery. On the outside we have only the main switch S2, the actuator which is a pressure switch (S1) and the output jack.
The resistors are all 1 / 8W or larger with any tolerance and the capacitors can be of any type. The trimpot serves as damping adjustment and also makes a slight tuning of the oscillator. The value of this component is not critical and can be between 47k ohm and 220k ohm.
TEST AND USE
Insert the batteries into the cradle and connect the unit to the input of an amplifier. Adjust the volume of the amplifier as desired. Then feed the oscillator and press S1 momentarily. Adjust the trimpot until you get the desired percussion sound. It is only necessary to use the appliance.
An interesting idea is a different bell for your home that will ring like a bell. If the S1 switch is located far from the oscillator, shielded wire must be used for its connection.
Semiconductors:
Q1 - BC547, BC548 or equivalent - general purpose NPN transistor
Resistors: (1 / 8W, 5%)
R1, R2 - 100 k ohm - brown, black, yellow
R3 - 10 k ohm - brown, black, orange
R4 - 4.7 k ohm - yellow, violet, red
P1 - 47 k ohm - trimpot
Capacitors:
C1 - 22 nF - polyester or ceramic
C2, C3-10 nF - polyester or ceramic
C4-47 nF - polyester or ceramic
Several:
S1 – Push button NA (Normally Open)
S2 – On/Off switch
B1 - 6 or 9V - 4 batteries or battery
Contact Matrix or printed circuit board, mounting box, battery holder or battery connector, jack, wires, shielded wire, solder, etc.


