Our circuit is a simple version of a digital frequency divider. The ultrasonic sounds that have been taped or picked up by a transducer are applied to the input of the circuit, which divides their frequency by a number chosen by the operator. In this manner, in the output of the circuit, the signal will drop to a frequency that is within the audible range. For instance, if a 30 kHz signal (ultrasonic) is applied to the circuit, which is programmed to divide its frequency by 6, in the output we hear will be a 5 kHz signal (in the audible range).
Some limitations are evident in this circuit due its simplicity. One of them is that the circuit operates with signal spikes, as it is digital, and the output is a rectangular signal. This means that the original wave shape is not preserved. The "thing" we are going to hear from the output is not a true conversion of the original sound, but something that corresponds to it. The circuit may be upgraded in several ways, such as the addition of filters to get improved results, or by some form of signal processing. The basic idea is intended to stimulate the reader's imagination toward creating new projects.
Another kind of upgrade to be considered by the readers is a wave shape conditioner, which can be made with a Schmitt trigger (a 4093, for instance) to con-vert fast changes of signal level into digital signals that could be processed more easily by the frequency divider.
How It Works
The circuit is formed basically by a CMOS integrated circuit acting as a frequency divider and a low-power audio amplifier driving a small loudspeaker or a headphone.
The divider is a CMOS 4020 IC, a 14-stage binary divider formed by a chain of flip-flops, each dividing the frequency applied to its input by two. Another option for the frequency divider is the 4040 CMOS IC.
We use outputs Q4, Q6, Q9, Q12, and Q14, which are preset to perform divisions by 16, 64, 512, 4,096, and 16,384. If we apply a 32 kHz signal to the circuit and take it from Q4 (divided by 16), the signal will be lowered to 2 kHz, falling in the audible range.
The reader is also free to modify the original project using other output of the CMOS 4020. These offer division by 2, 4, 8, 16, 32,..., 16,384.
If a 4 MHz signal is applied to the input and the circuit is programmed to di-vide by 4,096 (Q14), the output will be a 4 kHz signal (in the audible range). We must remind the reader that 4 MHz is just near the upper limit of input signals for the 4020 when powered from a 12 V supply. If the circuit is powered from four AA cells (6 V), as in this application, this upper limit will fall to about 2 MHz.
The circuit can be powered from AA cells or a 9 V battery It also can be used in interesting experiments involving ultrasonic sounds and even high-frequency signals, not only when editing tapes or picking up paranormal sounds but in many other applications as well.
Assembly
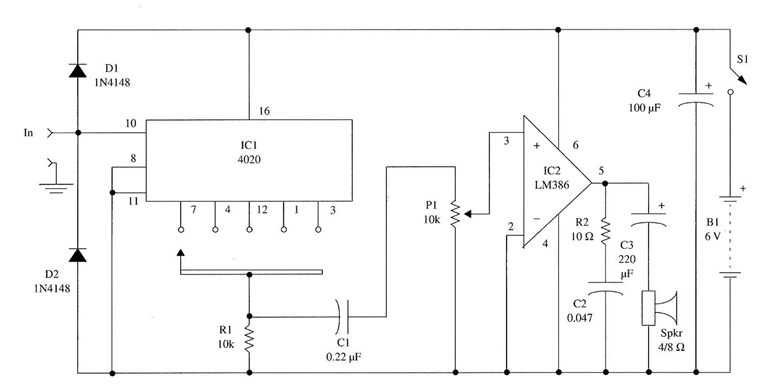
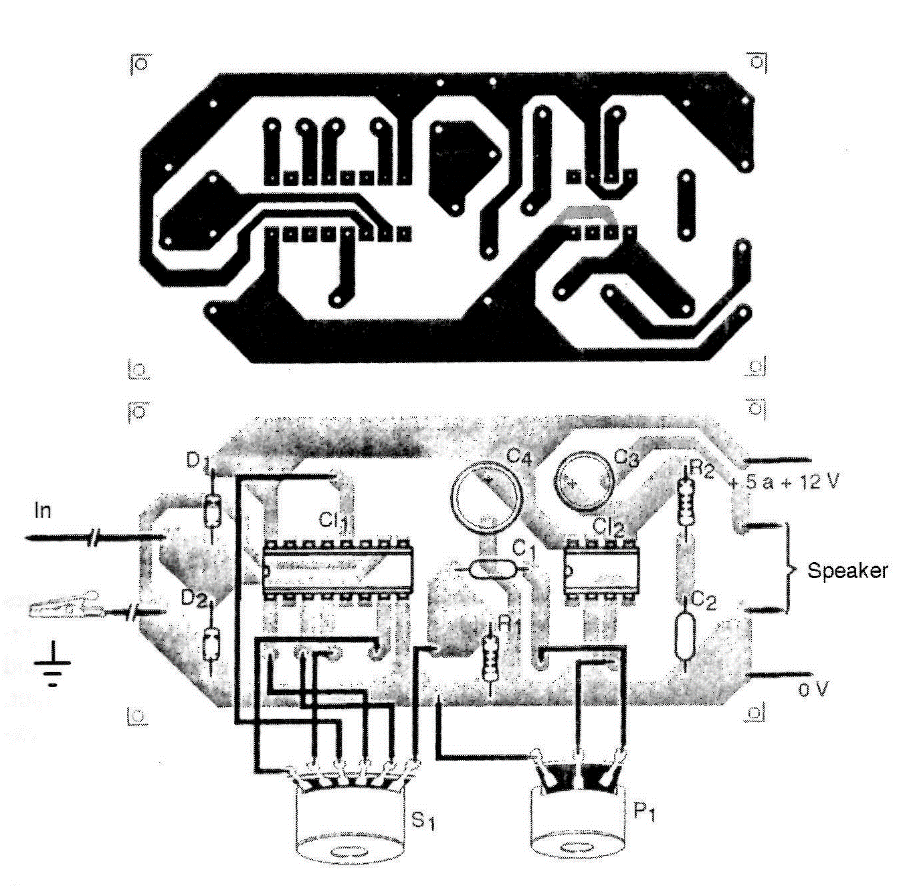
The complete schematic diagram of the ultrasonic converter is shown in Fig. 1. A printed circuit board for this project is suggested by Fig. 2
To program the frequency division in this circuit, the reader can use a rotary switch or a terminal strip with screen. The interconnection between the screws will determine the division rate of the circuit, as shown in Fig. 2.
Diodes D1 and D2 are used to protect the input of the circuit against spikes that can cause damage to the IC. We must remember that spikes with voltages above the power supply voltage can be dangerous to the IC. So, some care must be taken when adjusting the level of the input signal by P1. This means that P1 is not only the sensitivity control but also the limit control to the input signals.
P2 is used to adjust the output volume in the loudspeaker or headphone. For the input to the circuit, we can use an RCA jack or two wires with alligator clips. All the components can be housed in a small box whose dimensions are basically determined by the size of the loudspeaker (if used—you can replace the speaker with a headphone).
Using the Circuit
When using the circuit with signals from a source such as a tape recorder or an amplifier, apply the signal to the input of the circuit starting from the lower volume (P1 at the medium). Then, gradually increase the volume of the signal source until you hear something in the output. Don't go far from this point, or you may saturate the circuit or damage the IC.
Using the Circuit with Transducers
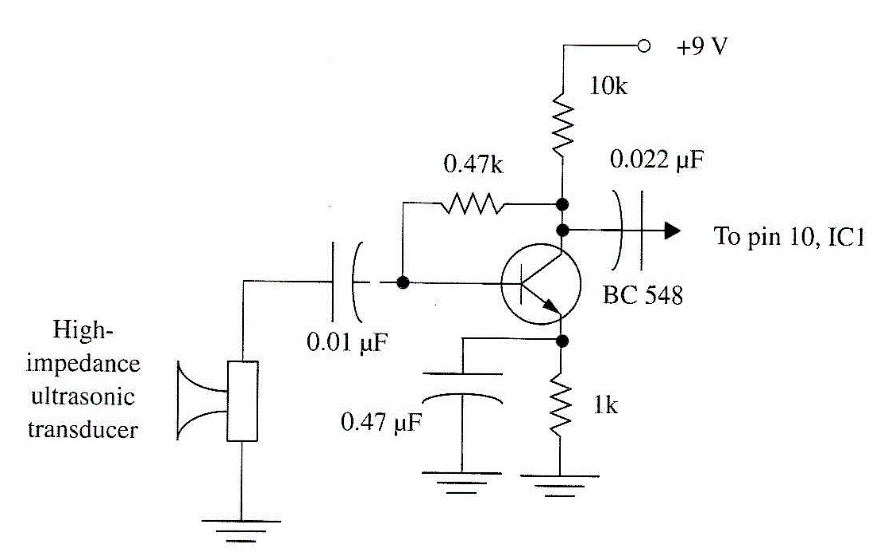
Many tweeters (high-frequency loudspeakers) can be used as ultrasonic transducers to obtain a reasonable gain (sensitivity) in frequencies up to 25 or 30 kHz. It is interesting to note the fact that a tweeter can be used both as a source of ultra-sonic sounds and as a receiver (microphone) for them. You only have to open it up and directly access the transducer as suggested in Project 8. A one-transistor amplifier stage for this transducer is shown in Fig. 3.
Any general-purpose silicon transistor can be used in this circuit, such as the BC548, 2N2222, etc. The power supply is the same as for the main circuit. As the current drain of this stage is very low, it doesn't reduce battery life appreciably.

Sounds between 15 kHz and 25 kHz or more can be heard in the headphones or loudspeaker using this project. If it is used to find voices by lowering the frequency of a recorded signal, plug the earphone into the input of the circuit and adjust the volume of the output until you hear the desired signal in the output. Find the correct value of frequency division by performing the recommended experiments.
Suggestions
■ This circuit can be used to pick up voices in an ambient filled with ultrasound. Its output should be plugged into the input of a tape recorder.
■ A capacitor with values between 10 nF and 1 pF can be placed between pin 3 of IC2 and the negative power supply rail to filter the sound.
■ The filters described in the projects for EVP can be used to process the sounds picked up with this circuit.
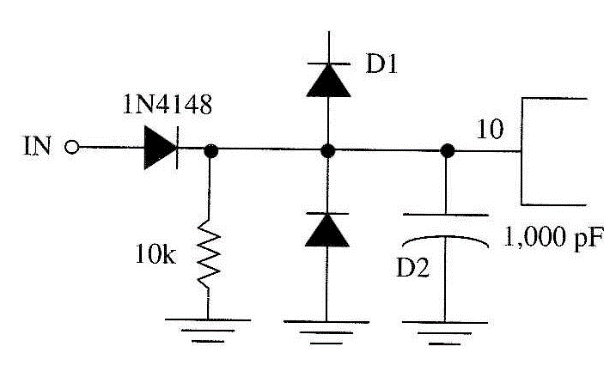
■ If a high-frequency signal is applied directly to the input of the circuit, a detector diode must be wired as shown in Fig. 4. The circuit can work with signals up to 2 MHz when powered from a 6 V power supply.

■ Directivity can be added to the microphone (ultrasonic transducer) if, for ex-ample, it is placed inside a metallic parabolic reflector. (The microphone must be placed in the focus of the parabolic reflector.) Diameters between 40 cm and 1 m are suggested for the parabolic reflector.
Semiconductors
IC1 4020 CMOS integrated circuit, 14-stage binary dividers
IC2 LM386 low-power audio amplifier integrated circuit
D1, D2 1N4148 or equivalent general-purpose silicon diodes Resistors
R1 10 kΩ, 1/8 W, 5%—brown, black, orange
R2 10 Ω, 1/8 W, 5%—brown, black, black Capacitors
C1 0.22 µF, ceramic or metal film
C2 0.047 µF, ceramic or metal film
C3 220 µF/12 WVDC, electrolytic
C4 100 µF/12 WVDC, electrolytic Miscellaneous
P1 10 kΩ - potentiometer
S1 SPST—toggle or slide switch
B1 6 V, four AA cells
SPKR 4 or 8 Ω, 5 to 10 cm, loudspeaker (or headphone) (see text)
Printed circuit board, input and output jacks (optional—see text), cell holder, plastic box, wires, solder, etc.


