Alligator clip as heatsink
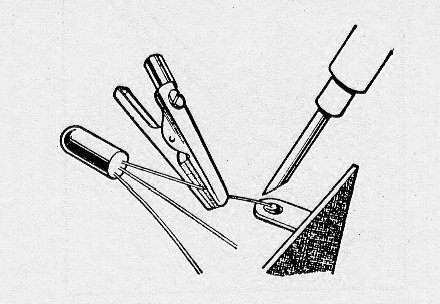
When welding sensitive long terminal components, such as transistors and diodes, an alligator clip can be used to prevent heat from the solder from spreading to the component body. This clip is simply attached to the terminal as shown in Figure 1. Allow the solder spot to cool before removing it.
Measuring a motor speed
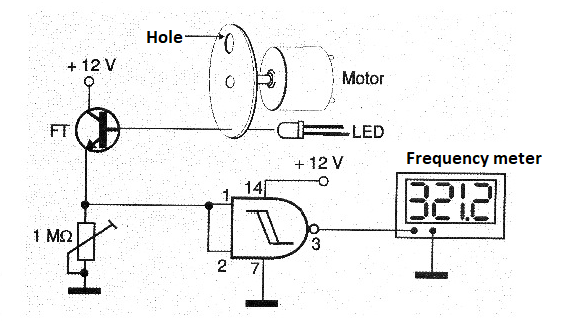
In Figure 2 we have an arrangement to measure the speed of rotation of a motor (rpm) using a frequency meter. The motor must be attached to a vise or, if it is fixed, must have its shaft released to place a small cardboard disk with a hole.
We then align an LED and a phototransistor, as shown in the figure, so that pulses can be applied to a 4093 integrated circuit (one of its gates).
The trimpot adjusts the circuit trigger. The assembly can be mounted on a protoboard. An oscilloscope or even an analog frequency meter can also be used if too much accuracy is not required.
Nail clipper as wire stripper
We can adapt a nail clipper to make it an efficient wire stripper. For this, we disassembled the cutter and with a file we made two small grooves according to the thickness of the wire that should be stripped, as shown in figure 3.
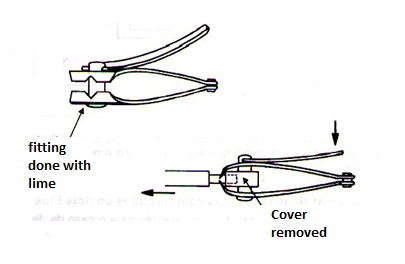
By then fixing the cutter to the edge of the workbench we can easily peel wires by snapping it into the cutter, pressing it in and pulling it out. In the same cutter, more than two grooves can be made depending on the thickness of the strands to be stripped.
Attachment of larger or heavier components
Bulk components should be attached to a PCB for something more than soldered terminals. In Figure 4 we give a suggestion of how to fix a 9V battery on a printed circuit board so that only its terminals do not have to do this function, which is not possible because the clips use flexible wires.
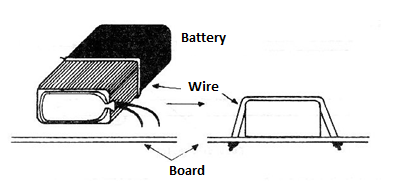
The fastener is a piece of rigid wire whose length depends on the size of the object to be fixed. See also item 49.
Pen tubes as board separators
Used ballpoint pen tubes should not be thrown away. We can use these tubes as printed circuit board separators in assemblies to hold and keep printed circuit boards in working position, as shown in Figure 5.
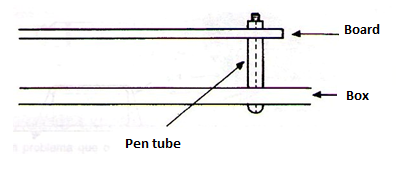
The internal screw is 1/8 inch, and the length will depend on the distance you want to keep the board inside the box and the thickness of the box itself.
Spaghetti
Spaghetti are wire caps that can be used to protect uninsulated wires and terminals. These spaghetti are used when there is a danger of one terminal touching another, as shown in figure 6.

Spaghetti is also used to protect exposed wire splices from contact with anyone or with live spots in a circuit.
It is interesting to always have a thicker piece of wire or even some length of wire caps (which can be purchased at specialist houses) to use for this purpose.
Repairing Cell Holder
Batteries may leak or simply leak gases that are highly corrosive and eventually attack the components of the device that must be powered. The pitiful state in which we find flashlights that cannot be recovered shows what the corrosive substance inside a battery can do.
In the case of electronic devices, when a leak occurs, the main component affected is the battery holder. By forming a sulphate or oxide cover over the contacts, which isolates the current, the batteries can no longer make contact with the holder and the device stops working. While the best solution is to switch support and there are cases where this is the only solution, the technician may attempt a recovery.
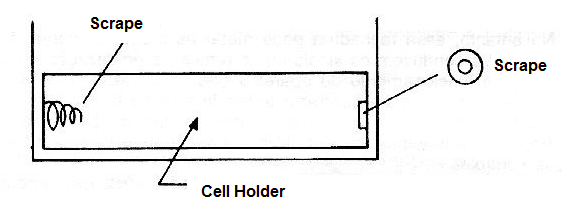
To do this, scrape the battery holder contacts with a sharp knife or razor until the shiny metal of the contacts is visible.
