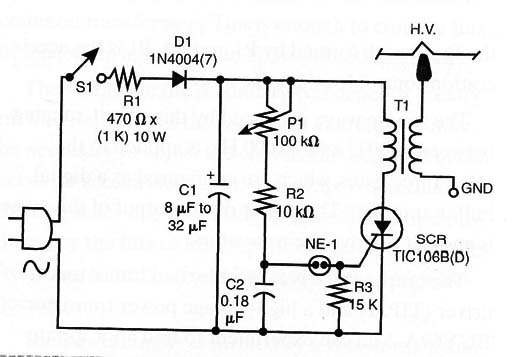
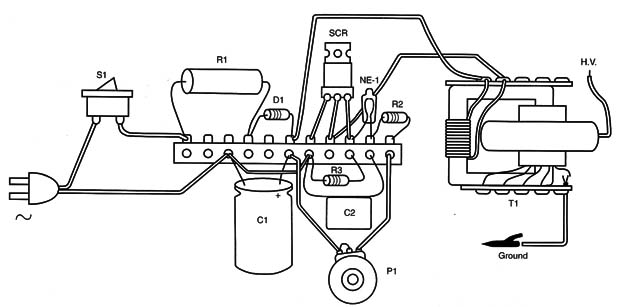
Another circuit suitable for the ion Ion motor is shown in Figure 1. Figure 2 shows the basic components soldered to a terminal strip.


Some readers may want to mount the same circuit using a printed circuit board (PCB), if one is available.
This circuit is very simple but has two important limitations. First, it is powered directly from the power supply line, so the reader must take much care when using it. The second limitation is the frequency, which is limited to a few kilohertz due the characteristics of the Silicon controlled rectifier (SCR).
This circuit operates as follows: The C1 capacitor is charged via the power supply line. At the same time, C2 charges via P1/R2 until the trigger voltage of the neon lamp is reached. At this moment, the lamp triggers the SCR on.
Passing from the off state to the on state, the SCR allows the C1 capacitor to discharge through the primary coil of the ilyback transformer. A high-voltage pulse is induced in the secondary coil.
As the capacitor discharges down to a level where the current of the SCR is holding steady, it turns off and a new cycle begins. The capacitors can also be charged again so that a new high-voltage pulse is produced. The repetition rate of the process is determined by adjusting P1.
L1, the primary coil of the transformer, is formed by 8 to 15 turns of 18 to 22 plastic-covered wire in the core of the flyback (as in the basic project earlier). C1 can have values in the range between 8 and 32 ,uF and a voltage rate over 200 volts.
The SCR doesn’t need to be mounted on a heatsink. The pulses produced by the discharging capacitor are not long enough to generate a large amount of heat.
Notice that you can replace the flyback transformer with a car ignition coil in your experiments.
SCR – TIC106B (D) (*) SCR
D1 - 1N4004 (7) (*) silicon rectifier diode
NE-1- NE-2H - or equivalent small neon lamp
R1 - 470 ohm x 10-watt (1 k x 10-watt) - wire-wound resistor
R2 - 10 k x 1/8-watt resistor (brown, black, orange)
R3 - 15 k x 1/8-watt resistor (brown, green, orange)
C1 - 8 µF to 32 µF x 200-volt electrolytic capacitor
C2 - 0.18 µFx 100-Volt ceramic or polyester film capacitor
P1 - 100 k ohm linear or logarithmic potentiometer
S1 - SPST switch (optional)
T1 - Flyback transformer
Terminal strip, power cord, wires, solder, knob for P1, wooden box, fuse holder, etc.
(*) These values are for the 220/240 volts of alternating current (Vac) power line.


