(*) This article was originally published in portuguese and included in my book Electronic Projects from the Next Dimensions. The text describes the circuit as a tool for paranormal experiments. See more in BM032E.
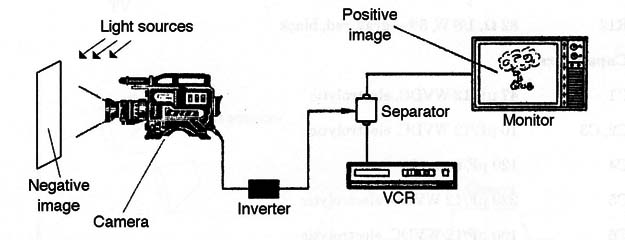
Using a video inverter, the researcher can “uninvert” images in the negative form, turning them into a positive form as shown in 1.

To work with these images, the EIP researcher will find a video inverter to be a useful tool.
A video inverter that can be placed between the VCR and the TV is described in this project. This circuit can also be placed between a camera and the VCR, registering inverted or negative images, adding a new kind of experiment to the researchers arsenal. Other paranormal experiments can be performed using this circuit, e. g., involving extra sensory perception (ESP) or transcendental meditation.
Note: the circuit only work with analog TV signals (video signals).
How It Works
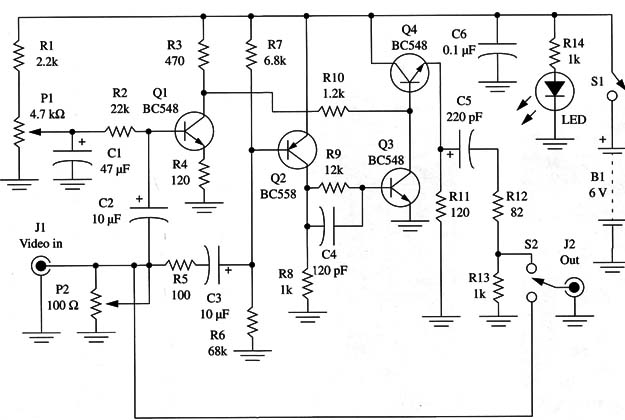
The circuit uses only common transistor stages. The amplitude of the input signals is controlled by P1. By adjusting this control, we can find the correct value of the input voltage to avoid saturating the circuit and to give to the pulse trigger circuit the signal needed for correct operation.
The video signal is inverted by Q1. This transistor is wired in the common emitter configuration where the input signal applied to the base appears with its phase inverted at the collector.
From this stage, the signal is applied to Q4, which is connected in the common collector configuration. In this configuration, the phase of the amplified signal is not inverted and, after amplification, we obtain it from a low-impedance output signal.
The synchronization pulse is operated by Q2 and Q3. These transistors amplify the pulse and mix it with the video signal, applying it to the base of Q4.
P2 is adjusted to find the best point of signal inversion, determining the contrast of the picture in the TV screen. SZ is used to return the signal to the original phase. This switch can be used to compare the inverted signal with the original signal when editing an image. The LED is a “power on” indicator and can be omitted.
The circuit can be powered from AA cells or a power supply plugged to the ac power line. The current drain is very low, extending the cells, life to many weeks.
Originally, this circuit was designed to descramble TV signals but, as the reader can see, there are many other uses for this simple configuration.
Assembly
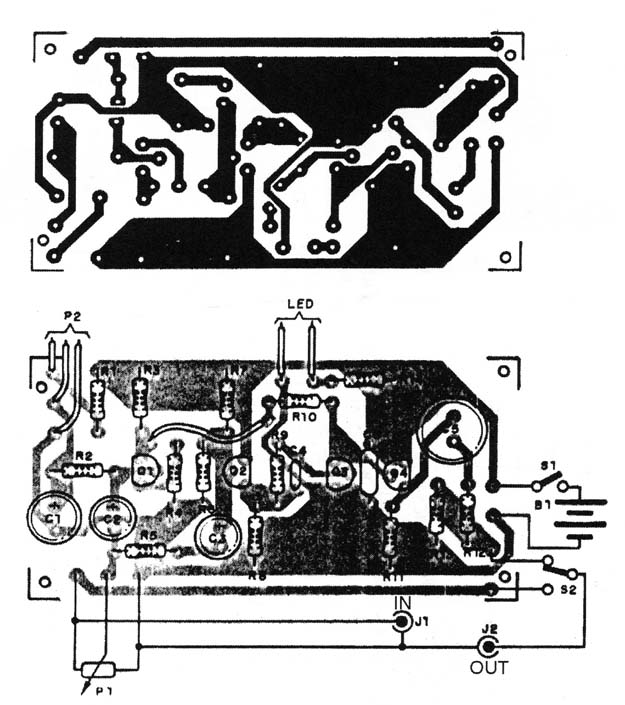
Figure 2 shows the diagram of the video inverter. The components can be mounted on printed circuit board as shown in Fig. 3.


The circuit is not critical, but it is important to keep all the connections short.
Cables with RCA plugs can be used to connect the video inverter between the VCR and the TV receiver (video input). Choose good quality, short video cables to avoid signal losses and distortions. Distortions can mask the results of the experiments. All the parts including the power supply can be housed in a small plastic box.
Using the Circuit
The circuit is placed between the VCR or camera and the TV receiver as shown in Fig. 4. P1 and P2 must be adjusted to give a stable picture on the screen. If you don,t obtain a stable picture in the TV, you may need to experiment with different values of C1.

Figure 5 shows how to perform a experiment with images taped from a screen and illuminated by several kinds of light sources while monitoring them with a TV receiver. The device used between the camera and the VCR/T V is a video separator:

Suggestions
All experiments involving images taped from white walls or a TV tuned to a free channel also can be made using the video inverter to modify the image.
Capture the images in the normal and inverted (negative) modes and edit them using a computer. Print the two images and compare.
Use the video inverter to produce an inverted white noise image in a TV, performing the common experiments With EIP.
Perform experiments using this circuit and the bar generator of the previous project.
Semiconductors
Q1 to Q4 BC548, 2N2222 or equivalent, general-purpose NPN silicon transistors
LED1 Common red LED (optional)
Resistors
R1 2.2 k ohm, 1/8 W, 5% - red, red, red
R2 22 k ohm, 1/8 W, 5% - red, red, orange
R3 470 ohm, 1/8 W, 5% - yellow, violet, brown
R4 120 ohm, 1/8 W, 5% - brown, red, brown
R5 100 ohm, 1/8 W, 5% - brown, black, brown
R6 68 k ohm, 1/8 W, 5% - blue, gray, orange
R7 6.8 k ohm, 1.8 W, 5% - blue, gray, red
R8, R13, R14 1 kº, 1/8 W, 5% - brown, black, red
R9 12 k ohm, 1.8 W, 5% - brown, red, orange
R10 1.2 k ohm 1/8 W, 5% - brown, red, red
R11 120 ohm, 1/8 W, 5% - brown, red, brown
R12 82 ohm, 1/8 W, 5% - gray, red, black
Capacitors
C1 47 µF/12 WVDC, electrolytic
C2, C3 10 µF/ 12 WVDC, electrolytic
C4 120 pF, ceramic
C5 220 µF/ 12 WVDC, electrolytic
C6 100 µF/ 12 WVDC, electrolytic
Miscellaneous
P1 100 ohm potentiometer (linear or log)
P2 1 k ohm potentiometer (linear or log)
S1 SPST, toggle or slide switch
S2 SPDT, toggle or slide switch
B1 6 V, four AA cells or power supply (see text)
J1, J2 Input and output RCA jacks Printed circuit board, plastic box, shielded cable, RCA jacks and plugs, cell holder, knobs for Pl and P2, wires, solder, etc.


